
User Guide
Important Notice
Information in this document, as well as the software described in it, is furnished under license and may be used or copied only in accordance with the terms of such license. The content of this manual is furnished for informational use only, is subject to change without notice, may contain technical inaccuracies or typographical errors, and should not be construed as a commitment by Docupace Technologies, Inc. and/or affiliates (“DOCUPACE”). DOCUPACE may make improvements and/or changes in the products and/or the programs described in this document at any time without notice.
Information published by DOCUPACE on the Internet/World Wide Web may contain references or cross-references to DOCUPACE products, programs, and services that are not announced or available in your country. Such references do not imply that DOCUPACE intends to announce such products, programs or services in your country. Consult your local DOCUPACE business contact for information regarding the products, programs and services that may be available to you.
In no event will DOCUPACE or its licensors be liable to any party for any direct, indirect, special or other consequential damages for any use of this product or its accompanying publications, including, without limitation, any lost profits, business interruption, loss of programs or other data on your information handling system or otherwise, even if we are expressly advised of the possibility of such damages. DOCUPACE provides this product and its publications “as is” without warranties or conditions of merchantability or fitness for a particular purpose. Some jurisdictions do not allow disclaimer of express of implied warranties in certain transactions; in that case, this notice may not apply.
Copyright
ã 2004, Docupace Technologies, Inc. and/or affiliates. All rights reserved.
You may not reproduce this document without the prior express written permission of Docupace Technologies, Inc., 2001 S Barrington Ave., Suite 106, Los Angeles, CA 90025.
Docupace Technologies, Inc., and/or affiliates and its licensors retain all ownership rights to this product (including but not limited to software, software libraries, interfaces, source codes and documentation).
This product’s source code is a confidential trade secret. You may not decipher, decompile, develop, or otherwise reverse engineer this software.
All brand names and product names used in this document are trade names, service marks, trademarks or registered trademarks of their respective owners.
Contact Information |
|
|
Telephone: 1-310-445-7722 Fax: 1-310-445-7787
|
Ground Mail: Docupace Technologies, Inc. 2001 S Barrington Ave., Suite 106 Los Angeles, CA 90025 |
|
E-mail: support@DOCUPACE.com Web Site: http://www.DOCUPACE.com
|
|
|
Hours of Operation: Monday through Friday 9:00a.m. – 5:30 p.m. Outside these hours, on-call 24X7 voicemail to be answered within 5 minutes |
|
TABLE OF CONTENTS
Chapter 4: Editing and Indexing
Chapter 5 : DocuFile Uploader Application
Preface
The Purpose of this Guide
This guide describes the main user operations for DOCUPACE. These operations include retrieving and scanning documents.
Audience description
This guide assumes the reader has a basic understanding of Windows.
The Structure of the Guide
The Introduction gives an overview of DOCUPACE system concepts. The Getting Started section gives brief instructions on how to start the application. A separate chapter describes each main user function.
Getting Help
DOCUPACE online Help describes each field in the application window and its functions.
Chapter 1: Introduction
This chapter introduces you to the Docupace system, and describes the concepts and objects available.
What is Docupace?
Docupace is retrieval and document management web based system.
Docupace Users
Docupace is designed for two types of users – system administrators and end users.
The system administrator sets up and manages the Docupace system. Setting up Docupace establishes the basic business used to manage the workflow.
The end users use Docupace to process documents routed to them. The workflow defines both from whom they can receive mail as well as to whom they can send it. Access to specific workflow objects is based on individual user profiles.
Docupace Data Structure
Chapter 2: Getting Started
This chapter explains how to start and end Docupace, and describes the basic functions available within the workflow objects.
Starting Docupace
Before starting Docupace, make sure you’re logged on to the Internet.
Enter the URL to the Docupace site and click “Enter”. That should bring up the Login Dialog Box.
This is the Login Screen on to the system.

To sign on to the system, enter the username and password and click login.
![]() - If Acrobat Reader is not yet
installed in your computer you must
- If Acrobat Reader is not yet
installed in your computer you must
install it by clicking on this button before logging in.
Chapter 3: Document Retrieval
This chapter explains the step-by-step process of retrieving documents that have already been scanned and indexed into the system.
Docupace Retrieval Window
At the top of the page there are tabs Sign Off, Help, and Contact.
Sign Off - Signs off user from the system and brings user back to the
Login Screen.
Help - Opens the system help window.
Contact - Displays the screen with the company contact information.
Located at the top left corner of the screen are the various buttons that represent the following:
Indexing - Displays documents that have been scanned but not yet
indexed.
Retrieve - Allows search and retrieve of documents that have been
scanned and indexed.
Administration - Used for initiation and monitoring of administrative
processes.
When the Retrieve process is selected, the retrieve page appears. At the top of the page several tabs will appear, which corresponds to the business layout. For example:
![]()
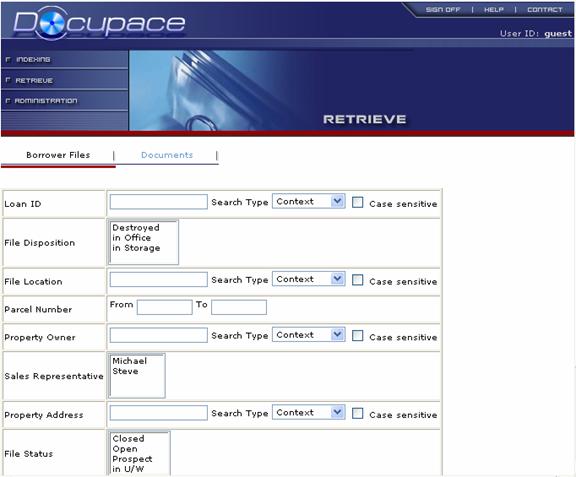
When the user selects the tab considered necessary, there will be several different search characteristics that need to be entered in order to retrieve the information that belongs to that particular document. Search characteristics may be alphanumerical characters, date and numerical values, or lists.
When the entry contains alphanumerical characters, the following data will appear:
![]()
Property Address - The identification number may consist of both
alphanumerical and numerical characters.
Search Type - Allows the user to pick the search process that will be
used to retrieve the folder, by clicking on the dropdown box
and choosing either:
None – when the entire entry is known
Begin with – when only the first few or one character is known.
End with – when only the last few or one character is known.
Context – when the user wants to obtain all the files that
contain the character(s) entered.
Case Sensitive -
![]() (activated) The
data entered must be in proper
(activated) The
data entered must be in proper
punctuation format, otherwise the folder will
not be retrieved.
![]() (de-activated) The
data entered doesn’t need to be in any
(de-activated) The
data entered doesn’t need to be in any
punctuation format, in order to retrieve the
folder.
When the entry contains only date and numerical values, the following will appear:
![]()
In the above example, to the right of the Number there is an entry area for the value fields From and To.
This can be used in these three different ways:
1. When the information needed is from a certain date/number and on, then enter the starting date/number in the From area and leave the To area blank.
2. When the information needed is up to a certain date/number, then leave the From area blank and enter the ending date/number in the To area.
3. When the information is located within two specific dates/numbers, then enter the starting date/number in the From area and the ending date/number in the To area.
When the entry consists of a list, the following will appear:

Using the mouse and the scroll bar, locate the object type required. Select it by clicking on it (more than one object can be selected simultaneously by holding down the control key (Ctrl) and clicking on the various objects).
Submit – After all the information is entered, clicking on submit will
retrieve the folder(s).
Clear All – Allows the user to erase all the information entered and start
over.
Docupace Query Window
Depending on the characteristics that the user entered in the Docupace Retrieval Window, a list of related documents will appear in the Docupace Query Window.

New Query - Allows the user to go back to the retrieval window.
![]() - Allows the user to
create a new document. Clicking on the piece of paper will
- Allows the user to
create a new document. Clicking on the piece of paper will
bring up a brand new reference area where a new folder can be created.
![]() - Allows the user to view the next page, if
there is too much
- Allows the user to view the next page, if
there is too much
information to fit on the first page of the search screen.
![]() - Allows the user to go back to the
previous page.
- Allows the user to go back to the
previous page.
![]() - Allows
the user to sort the contents by Loan ID or just the ID.
- Allows
the user to sort the contents by Loan ID or just the ID.
To view the contents within the chosen folder, selecting Detail and click on it will display the information on the subsequent screen.
Docupace File Information
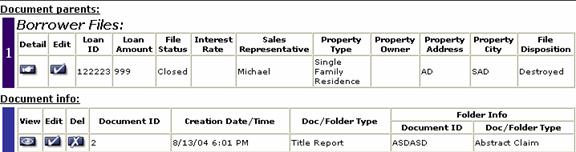
Or
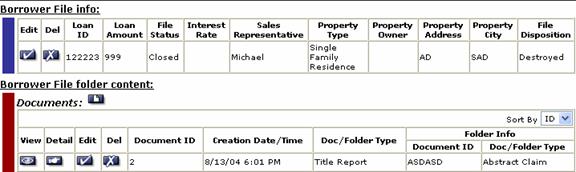
Within these screens there may be: a Current Position, Folder Parents, and Folder Children.
Current Position - Is highlighted in blue and represents the folder
information. If the Current Position is included in other
folders in the system then there are Folder Parents,
which are located directly above the Current Position.
Folder Parents - Is highlighted in dark blue. May have more than one level.
For example, the Current Position can be located within the level 1
folder, and the level 1 folder can be located within the level 2
folder, and the level 2 folder cab be located within the
level 3 folder and so on.
Folder Children - Are located directly below the Current Position and represent all the different subfolders within the Current Position. These subfolders are grouped by their object types. They are highlighted in red.
The features known as View, Detail, Edit and Del (delete) are fixed.
Detail - When the user selects the Detail feature for any folder, then that
individual folder becomes the Current Position.
View - Allows the user to view the images corresponding to that particular folder.
Chapter 4: Editing and Indexing
This chapter explains how to edit and index documents.
Edit Screen 1
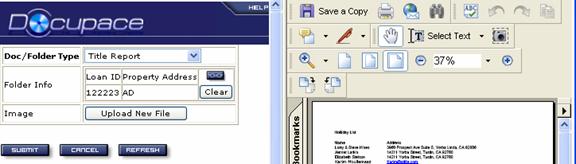
Edit – Allows the user to make any changes to the individual
folder chosen.
Bold Letters – Any characteristic that is in bold letters cannot be
cleared, only changed because it is a mandatory
feature.
Un-bolded Letters – Can be erased and left blank, because it is not
a mandatory feature.
Doc / Folder Type – Can be changed by clicking on the drop-down arrow,
this then will produce a list. From this list the user can
choose a different position by scrolling up and down
through the list and the position will automatically be changed.
Clear – Allows the user to remove reference from the current
position. To make a new reference, click on the
binoculars. If the system contains numerous amounts
of records then the Retrieve Screen will appear. If the
system contains only a few records then the Search
Screen will appear. In both cases the user will choose
a different folder and submit it.
Upload New File – Allows the user to upload and attach any image from
computer to that individual folder.
Edit Screen 2
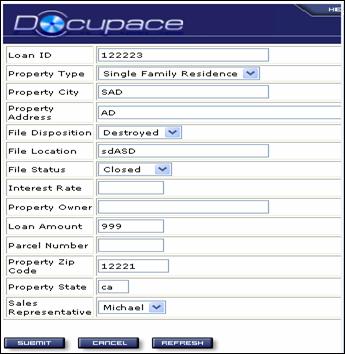
Within this screen the user may fill in manually as many fields as needed and can also choose from the drop-down arrows of specific fields.
Del – Allows the user to delete the Current Position. In order
to delete the entire folder (Folder Parent) the user
must first delete all the Folder Children and then the
Folder Parent.
Indexing Screen
When the user selects the INDEXING button, located at the top left corner of the screen, the following screen will appear:
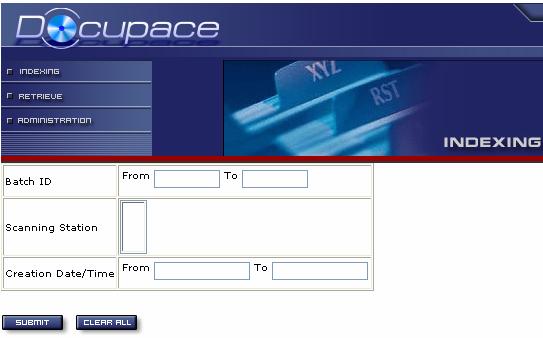
Batch ID - Allows the user to search for a particular document or for a couple of
documents within a specific range.
Scanning Station - Displays the names of the scanning stations that are being used. When
searching for a document(s) to index, the user can choose the station
that was used to scan that document.
Creation Date/Time - Allows the user to search for a document on a specific date/time or
within a specific range.
Clicking submit will bring up the document that corresponds to the search criteria.
Chapter 5 : Administration
When the Administration process is selected the following screen will appear:
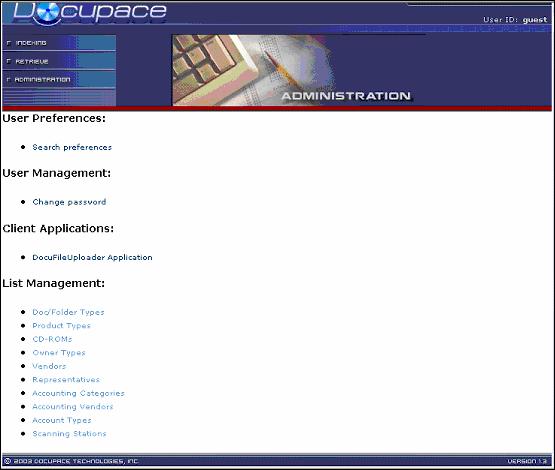
User Preferences
Search preferences - clicking on this link will bring up a new screen where the
user can specify different user preferences.
User Management
Change password - clicking on this link will bring up the following screen:
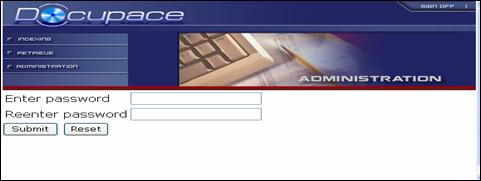
In this screen the user can change an existing password and also create a new one.
Client Applications
DocuFile Uploader Application - clicking on this link allows the user to send files from the
local user computer to the system.
When the user starts this program for the first time, the system checks to make sure that the application hasn’t been run before. If it hasn’t, then the program uploads the application from the web site. Depending on the user Internet speed connection this process varies in time.
After the system uploads the program from the Internet, the system asks for a confirmation that the user does want to continue and launch the program. Clicking Start would continue the set up.
Login Screen
The following steps outline the functions of this program:
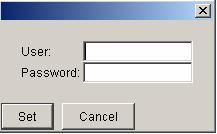
1. Enter a valid User name and Password to login to the program and click Set. This window can also be found under the Run command on the toolbar under Relogin.
When using this program for the first time the following screen will appear. For future references, this window can also be founder under the Run command on the toolbar under Properties. The first three fields are the connection information to the server. They are set automatically. The Polling interval field displays the seconds that the system waits in between sending files. Only one file at a time can be sent. This information should not be changed unless stated otherwise by the administrator.
Properties Screen
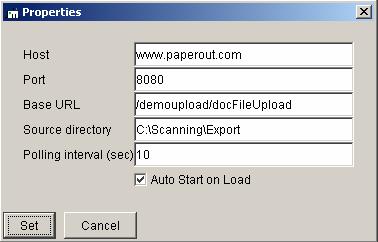
2. The Source directory is the only field that the user must define. This is the location where the files are going to be transferred. In this example the files are going to be sent to the (C :) drive to the Export folder in the Scanning folder. Clicking Set will begin the program. There are two limitations on transferred file names. The application can’t process files with long file names and files without extension.
![]() The system automatically starts
searching through the Source Directory to see if there are files there. If
there are, then the program automatically sends the first file without having
to click on the Send Button.
The system automatically starts
searching through the Source Directory to see if there are files there. If
there are, then the program automatically sends the first file without having
to click on the Send Button.
![]() The system starts, but if there are
files in the Source Directory the program doesn’t send them until the user
clicks on the Send Button.
The system starts, but if there are
files in the Source Directory the program doesn’t send them until the user
clicks on the Send Button.
Main Screen
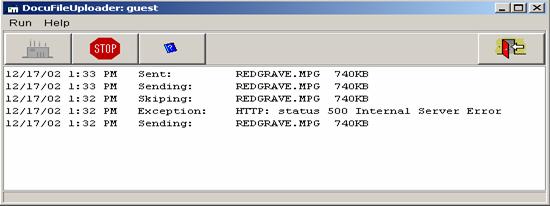
![]() (Send Button) Clicking on this
button initiates the program to search through the Source Directory to see if
there are any files there and send them.
(Send Button) Clicking on this
button initiates the program to search through the Source Directory to see if
there are any files there and send them.
![]() (Stop Button) Clicking on this button
stops the program from searching the Source Directory.
(Stop Button) Clicking on this button
stops the program from searching the Source Directory.
![]() (Help Button) Clicking on this button
allows the user to access the Help directory.
(Help Button) Clicking on this button
allows the user to access the Help directory.
![]() (Exit Button)
Clicking on this button allows the user to exit the program.
(Exit Button)
Clicking on this button allows the user to exit the program.
List Management
Doc / Folder Types – clicking on this link will bring up the following screen, keep in mind
that for all different businesses the lists of management will vary.
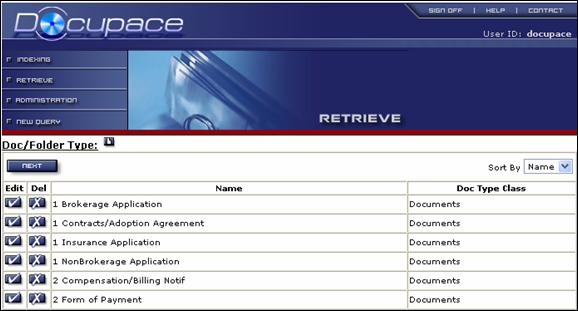
![]() - clicking
on this button will bring up a screen where the user can enter a new
- clicking
on this button will bring up a screen where the user can enter a new
Doc/Folder type.
![]() -
clicking on this button will bring up a screen where the user can edit the
existing
-
clicking on this button will bring up a screen where the user can edit the
existing
Doc/Folder type.
![]() -
clicking on this button will delete the current Doc/Folder type.
-
clicking on this button will delete the current Doc/Folder type.